Customizing Voilà#
There are many ways you can customize Voilà to control the look and feel of the dashboards you create.
Changing the theme#
By default, Voilà uses the light theme, but you can set the theme to dark by passing the following option:
voila <path-to-notebook> --theme=dark
Or by passing in the query parameter voila-theme, e.g. a URL like http://localhost:8867/voila/render/query-strings.ipynb?voila-theme=dark.
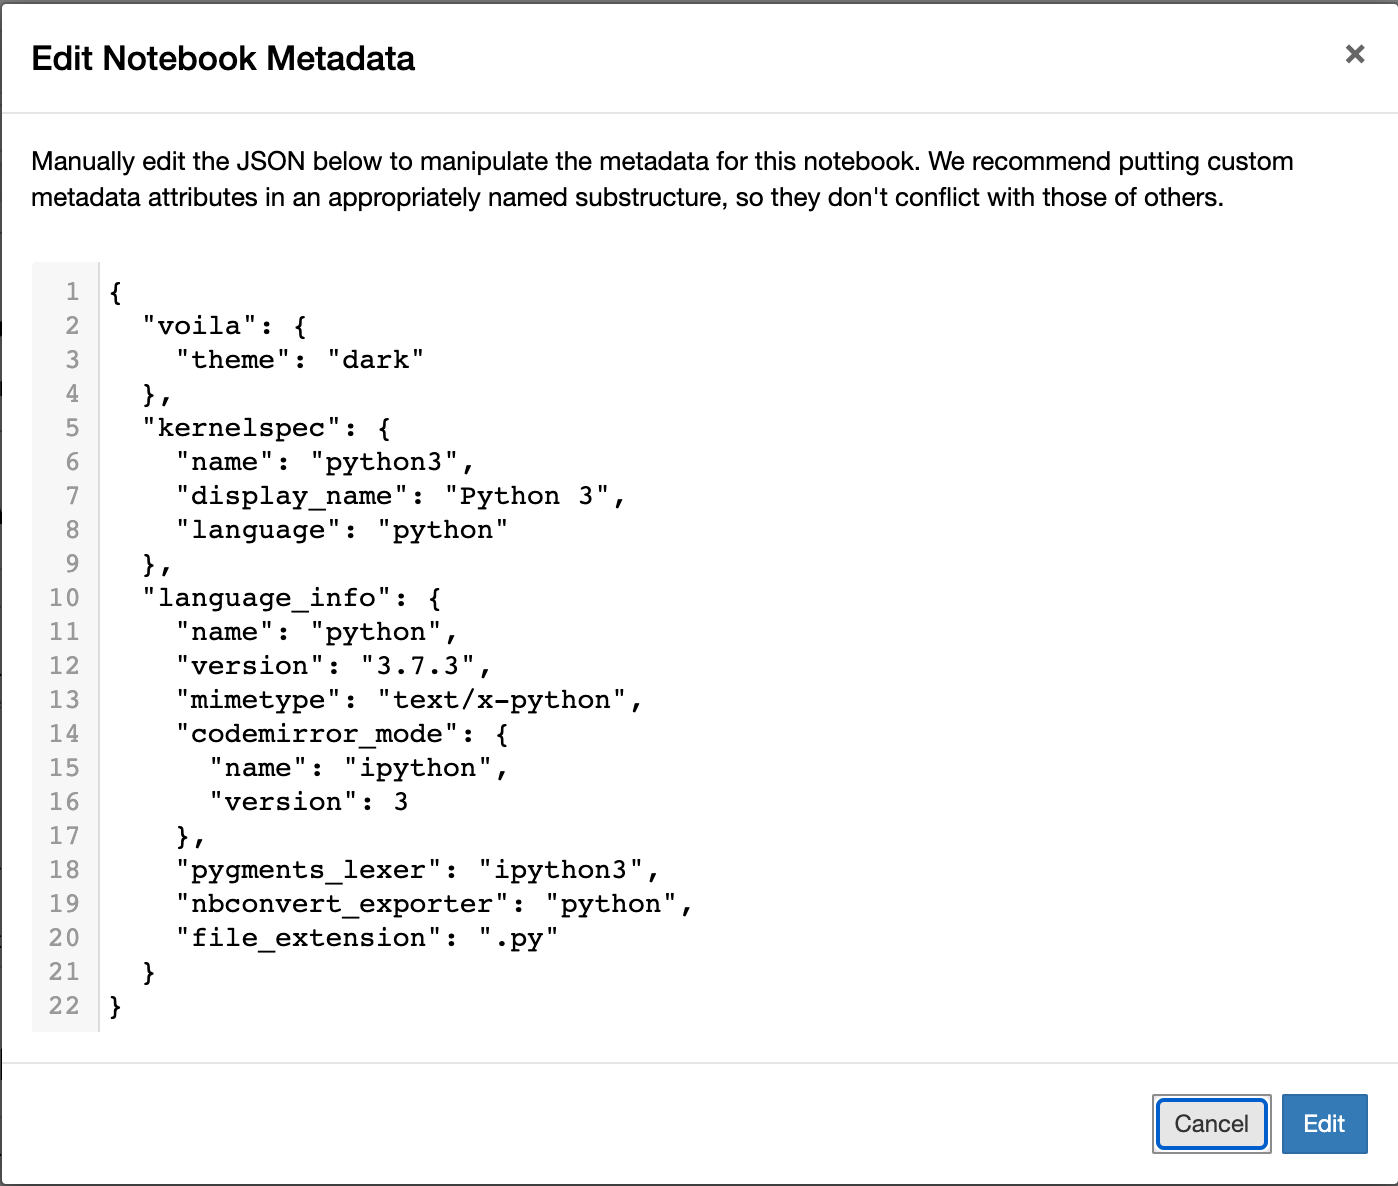
The theme can also be set in the notebook metadata, under metadata/voila/theme by editing the notebook file manually, or using the metadata editor in for instance the classical notebook
System administrators who want to disable changing the theme, can pass --VoilaConfiguration.allow_theme_override=NO or
--VoilaConfiguration.allow_theme_override=NOTEBOOK to disable changing the theme completely, or only allow it from the notebook metadata.
Like nbconvert, Voilà supports the light and dark themes by default, but you can also use custom JupyterLab themes:
pip install jupyterlab_miami_nights
voila <path-to-notebook> --theme=jupyterlab_miami_nights
Warning
Theme are specific to the “lab” template, they will not work for the “classic” template
Note
Changing the theme from the notebook metadata may change in the future if this features moves to nbconvert.
Controlling the nbconvert template#
Voilà uses nbconvert to convert your Jupyter Notebook into an HTML dashboard. nbconvert has a rich templating system that allows you to customize the way in which your Jupyter Notebook is converted into HTML.
By default, Voilà will render the HTML from your notebook in the same linear fashion that the notebook follows. If you’d like to use a different layout, this can be controlled by creating a new nbconvert template, registering it with Voilà, and calling it from the command-line like so:
voila <path-to-notebook> --template=<name-of-template>
For example, Voilà includes one other template that uses a Javascript library and
an alternate <div> layout in order to let the user drag and drop cells.
For example, to use the gridstack template, use the command:
voila <path-to-notebook> --template=gridstack
Or by passing in the query parameter voila-template, e.g. a URL like http://localhost:8867/voila/render/query-strings.ipynb?voila-template=material (Note that this requires installing voila-material).
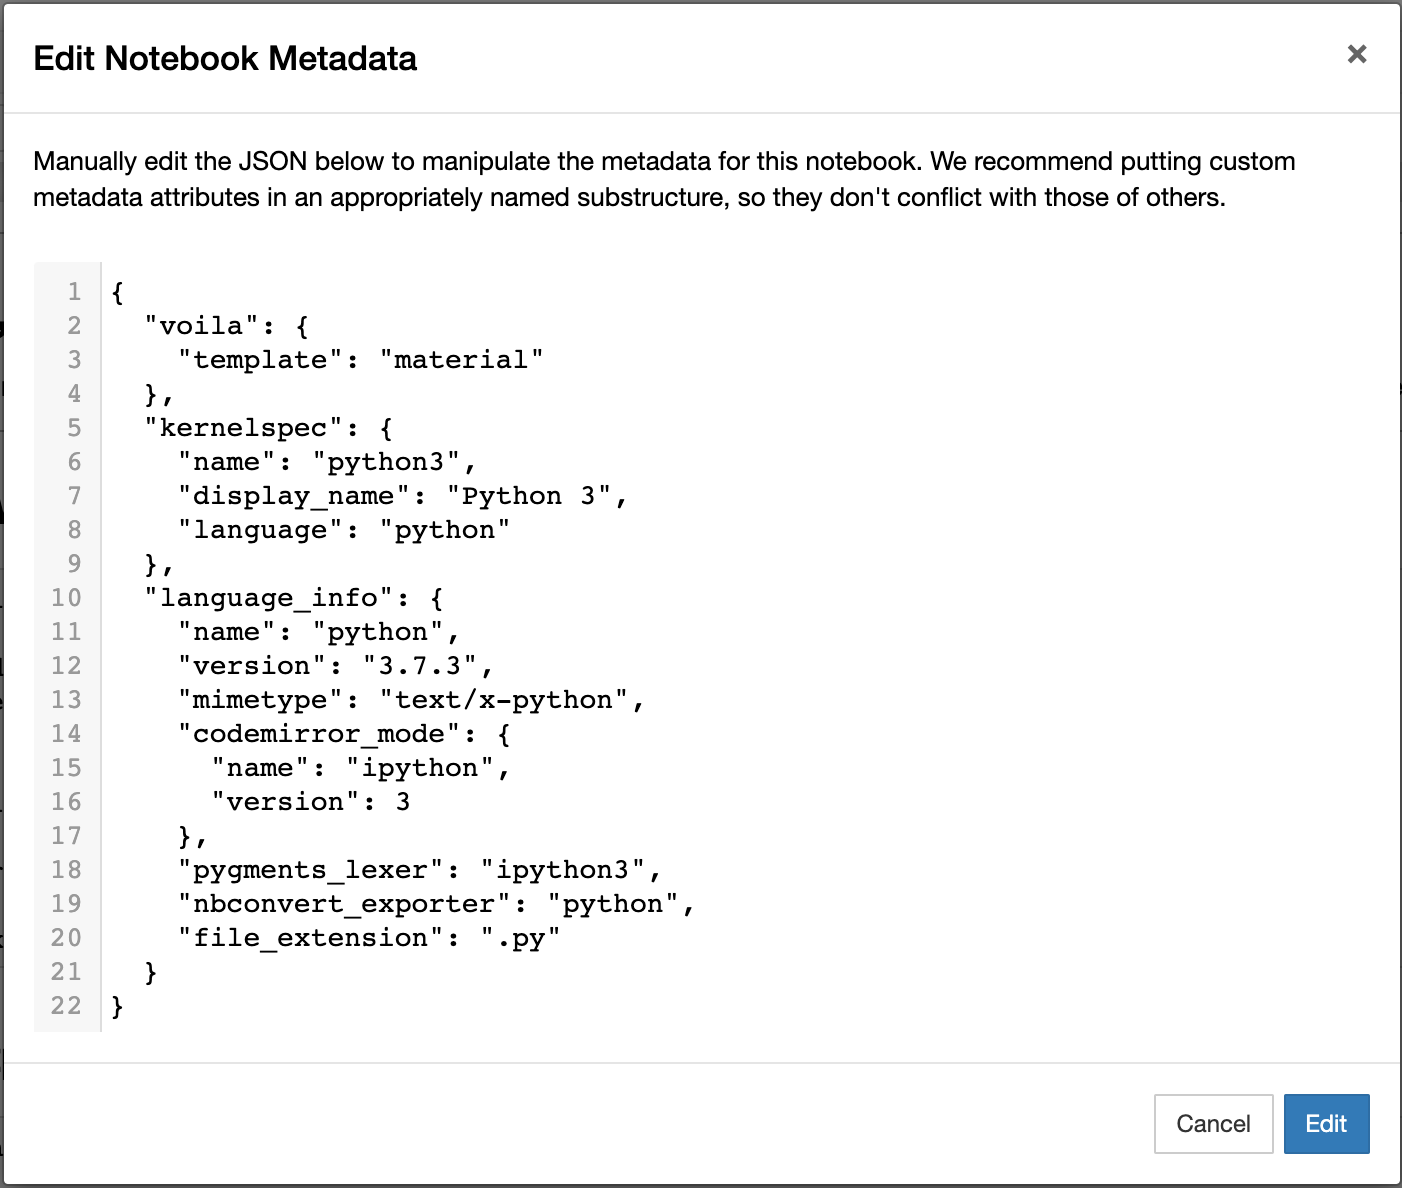
The template can also set in the notebook metadata, under metadata/voila/template by editing the notebook file manually, or using the metadata editor in for instance the classical notebook
System administrators who want to disable changing the theme, can pass --VoilaConfiguration.allow_template_override=NO` or
``--VoilaConfiguration.allow_template_override=NOTEBOOK to disable changing the theme completely, or only allow it from the notebook metadata.
Note
Changing the template from the notebook metadata may change in the future if this features moves to nbconvert.
Creating your own template#
You can create your own nbconvert template for use with Voilà. This allows you to control the look and feel of your dashboard.
In order to create your own template, first familiarize yourself with Jinja, HTML, and CSS. Each of these is used in creating custom templates. For more information, see the nbconvert templates documentation. For one example, check out the nbconvert basic HTML template.
A few example voila/nbconvert template projects are:
Install a custom template#
Suppose you created a custom template called mytemplate, defined in a set of
directories located on your machine at /path/to/custom/.
You can install the custom template for use with Voilà like so:
from voila.paths import install_custom_template

custom_template_name = 'mytemplate'
share_path = '/path/to/custom/'

install_custom_template(share_path, custom_template_name)
This function will try to symlink (preferred) or copy (fallback option) the
directories defining mytemplate to the paths where voilà keeps other
templates. share_path should contain the directories
share/jupyter/nbconvert/templates/mytemplate and
share/jupyter/voila/templates/mytemplate.
Accessing the tornado request (prelaunch-hook)#
In certain custom setups when you need to access the tornado request object in order to check for authentication cookies, access details about the request headers, or modify the notebook before rendering. You can leverage the prelaunch-hook, which lets you inject a function to inspect the notebook and the request prior to executing them.
Warning
Because prelaunch-hook only runs after receiving a new request but before the notebook is executed, it is incompatible with preheated kernels.
Creating a hook function#
The format of this hook should be:
def hook(req: tornado.web.RequestHandler,
         notebook: nbformat.NotebookNode,
         cwd: str) -> Optional[nbformat.NotebookNode]:
The first argument will be a reference to the tornado RequetHandler, with which you can inspect parameters, headers, etc.
The second argument will be the NotebookNode, which you can mutate to e.g. inject cells or make other notebook-level modifications.
The last argument is the current working directory should you need to mutate anything on disk.
The return value of your hook function can either be None, or a NotebookNode.
Adding the hook function to Voilà#
There are two ways to add the hook function to Voila:
Using the voila.py configuration file:
Here is an example of the configuration file. This file needs to be placed in the directory where you start Voilà.
def hook_function(req, notebook, cwd):
   """Do your stuffs here"""
   return notebook

c.Voila.prelaunch_hook = hook_function
Start Voila from a python script:
Here is an example of a custom prelaunch-hook to execute a notebook with papermill:
def parameterize_with_papermill(req, notebook, cwd):
    import tornado

    # Grab parameters
    parameters = req.get_argument("parameters", {})

    # try to convert to dict if not e.g. string/unicode
    if not isinstance(parameters, dict):
        try:
            parameters = tornado.escape.json_decode(parameters)
        except ValueError:
            parameters = None

    # if passed and a dict, use papermill to inject parameters
    if parameters and isinstance(parameters, dict):
        from papermill.parameterize import parameterize_notebook

        # setup for papermill
        #
        # these two blocks are done
        # to avoid triggering errors
        # in papermill's notebook
        # loading logic
        for cell in notebook.cells:
            if 'tags' not in cell.metadata:
                cell.metadata.tags = []
            if "papermill" not in notebook.metadata:
                notebook.metadata.papermill = {}

        # Parameterize with papermill
        return parameterize_notebook(notebook, parameters)
To add this hook to your Voilà application:
from voila.app import Voila
from voila.config import VoilaConfiguration

# customize config how you like
config = VoilaConfiguration()

# create a voila instance
app = Voila()

# set the config
app.voila_configuration = config

# set the prelaunch hook
app.prelaunch_hook = parameterize_with_papermill

# launch
app.start()
Adding your own static files#
If you create your own theme, you may also want to define and use your own static files, such as CSS and Javascript. To use your own static files, follow these steps:
Create a folder along with your template (e.g.,
mytemplate/static/).Put your static files in this template.
In your template file (e.g.
voila.tpl), link these static files with the following path:{{resources.base_url}}voila/static/<path-to-static-files>
When you call
voila, configure the static folder by using the--statickwarg, or by configuring--VoilaConfiguration.static_root.
Any folders / files that are inside the folder given with this configuration
will be copied to {{resources.base_url}}voila/static/.
For example, if you had a CSS file called custom.css in static/css,
you would link it in your template like so:
<link rel="stylesheet" type="text/css" href="{{resources.base_url}}voila/static/css/custom.css"></link>
Configure Voilà for the Jupyter Server#
Several pieces of voila’s functionality can be controlled when it is
run. This can be done either as a part of the standalone CLI, or with the
Jupyter Server. To configure voila when run by the Jupyter Server,
use the following pattern when invoking the command that runs Jupyter (e.g.,
Jupyter Lab or Jupyter Notebook):
<jupyter-command> --VoilaConfiguration.<config-key>=<config-value>
For example, to control the template used by voila from within a Jupyter
Lab session, use the following command when starting the server:
jupyter lab --VoilaConfiguration.template=distill
When users run voila by hitting the voila/ endpoint, this configuration
will be used.
Serving static files#
Unlike JupyterLab or the classic notebook server, voila does not serve
all files that are present in the directory of the notebook. Only files that
match one of the whitelists and none of the blacklist regular expression are
served by Voilà:
voila mydir --VoilaConfiguration.file_whitelist="['.*']" \
  --VoilaConfiguration.file_blacklist="['private.*', '.*\.(ipynb)']"
Which will serve all files, except anything starting with private, or notebook files:
voila mydir --VoilaConfiguration.file_whitelist="['.*\.(png|jpg|gif|svg|mp4|avi|ogg)']"
Will serve many media files, and also never serve notebook files (which is the default blacklist).
Run scripts#
Voilà can run text (or script) files, by configuring how a file extension maps to a kernel language:
voila mydir --VoilaConfiguration.extension_language_mapping='{".py": "python", ".jl": "julia"}'
Voilà will find a kernel that matches the language specified, but can also be configured to use a specific kernel for each language:
voila mydir --VoilaConfiguration.extension_language_mapping='{".py": "python", ".jl": "julia"}'\
  --VoilaConfiguration.language_kernel_mapping='{"python": "xpython"}'
In this case it will use the xeus-python. kernel to run .py files.
Note that the script will be executed as notebook with a single cell, meaning that only the last expression will be printed as output. Use the Jupyter display mechanism to output any text or rich output such as Jupyter widgets. For Python this would be a call to IPython.display.display.
Using Jupytext is another way to support script files. After installing jupytext, Voilà will see script files as if they are notebooks, and requires no extra configuration.
Cull idle kernels#
Voilà starts a new Jupyter kernel every time a notebook is rendered to the user. In some situations, this can lead to a higher memory consumption.
The Jupyter Server exposes several options that can be used to terminate kernels that are not active anymore. They can be configured using the Voilà standalone app:
voila --MappingKernelManager.cull_interval=60 --MappingKernelManager.cull_idle_timeout=120
The server will periodically check for idle kernels, in this example every 60 seconds, and cull them if they have been idle for more than 120 seconds.
The same parameters apply when using Voilà as a server extension:
jupyter notebook --MappingKernelManager.cull_interval=60 --MappingKernelManager.cull_idle_timeout=120
There is also the MappingKernelManager.cull_busy and MappingKernelManager.cull_connected options to cull busy kernels and kernels with an active connection.
For more information about these options, check out the Jupyter Server documentation.
Preheated kernels#
Since Voilà needs to start a new jupyter kernel and execute the requested notebook in this kernel for every connection, this would lead to a long waiting time before the widgets can be displayed in the browser. To reduce this waiting time, especially for heavy notebooks, users can activate the preheating kernel option of Voilà.
Warning
Because preheated kernels are not executed on request, this feature is incompatible with the prelaunch-hook functionality.
This option will enable two features:
A pool of kernels is started for each notebook and kept in standby, then the notebook is executed in every kernel of its pool. When a new client requests a kernel, the preheated kernel in this pool is used and another kernel is started asynchronously to refill the pool.
The HTML version of the notebook is rendered in each preheated kernel and stored, when a client connects to Voila, under some conditions, the cached HTML is served instead of re-rendering the notebook.
The preheating kernel option works with any kernel manager, it is deactivated by default, re-activate it by setting preheat_kernel = True. For example, with this command, for each notebook Voilà started with, a pool of 5 kernels is created and will be used for new connections.
voila --preheat_kernel=True --pool_size=5
The default environment variables for preheated kernels can be set by the VoilaKernelManager.default_env_variables setting. For example, this command
voila --preheat_kernel=True --VoilaKernelManager.default_env_variables='{"FOO": "BAR"}'
will set the variable “FOO” in all preheated kernels.
If the pool size does not match the user’s requirements, or some notebooks need to use specific environment variables…, additional settings are needed. The easiest way to change these settings is to provide a file named voila.json in the same folder containing the notebooks. Settings for preheating kernel ( list of notebooks does not need preheated kernels, number of kernels in pool, refilling delay, environment variables for starting kernel…) can be set under the VoilaKernelManager class name.
Here is an example of settings with explanations for preheating kernel option.
# voila.json
{
   "VoilaConfiguration": {
      # Activate or deactivate preheat kernel option.
      "preheat_kernel": true
   },
   "VoilaKernelManager": {
      # A list of notebook name or regex patterns to exclude notebooks from using preheat kernel.
      "preheat_blacklist": [
         "notebook-does-not-need-preheat.ipynb",
         "^.*foo.*$",
         ...
      ],
      # Configuration for kernel pools
      "kernel_pools_config": {
         # Setting for `voila.ipynb` notebook
         "voila.ipynb": {
            "pool_size": 3, # Size of pool
            "kernel_env_variables": { # The environment variables used to start kernel for `voila.ipynb`
               "foo2": "bar2"
            }
         },
         # Setting for `test/sub-voila.ipynb` notebook
         "test/sub-voila.ipynb": {
            "pool_size": 1
         },
         ...
         # If a notebook does not have setting, it will use default setting
         "default": {
            "pool_size": 2,
            "kernel_env_variables": {
               "foo": "bar"
            }
         },
      },
      # Delay time in second before filling the kernel pool.
      "fill_delay": 0
   }
}
Notebook HTML will be pre-rendered with template and theme defined in VoilaConfiguration or notebook metadata. The preheated kernel and cached HTML are used if these conditions are matched:
There is an available preheated kernel in the kernel pool.
If user overrides the template/theme with query string, it must match the template/theme used to pre-render the notebook.
If the kernel pool is empty or the request does not match these conditions, Voila will fail back to start a normal kernel and render the notebook as usual.
Partially pre-render notebook#
To benefit the acceleration of preheating kernel mode, the notebooks need to be pre-rendered before users actually connect to Voilà. But in many real-world cases, the notebook requires some user-specific data to render correctly the widgets, which makes pre-rendering impossible. To overcome this limit, Voilà offers a feature to treat the most used method for providing user data: the URL query string.
Note
For more advanced interaction with the tornado request object, see the prelaunch-hook feature.
In normal mode, Voilà users can get the query string at run time through the QUERY_STRING environment variable:
import os
query_string = os.getenv('QUERY_STRING')
In preheating kernel mode, users can prepend with wait_for_request from voila.utils
import os
from voila.utils import wait_for_request
wait_for_request()
query_string = os.getenv('QUERY_STRING')
wait_for_request will pause the execution of the notebook in the preheated kernel at this cell and wait for an actual user to connect to Voilà, set the request info environment variables and then continue the execution of the remaining cells.
If the Voilà websocket handler is not started with the default protocol (ws), the default IP address (127.0.0.1) the default port (8866) or with url suffix, users need to provide these values through the environment variables VOILA_WS_PROTOCOL, VOILA_APP_IP, VOILA_APP_PORT and VOILA_WS_BASE_URL. One way to set these variables is in the voila.json configuration file, for example:
# voila.json
{
   ...
   "VoilaKernelManager": {
      "kernel_pools_config": {
         "foo.ipynb": {
            "kernel_env_variables": {
               "VOILA_APP_IP": "192.168.1.1",
               "VOILA_APP_PORT": "6789",
               "VOILA_WS_PROTOCOL": "wss"
            }
         }
      },
   ...
   }
}
Additionally, you can set these with the command:
voila --preheat_kernel=True --VoilaKernelManager.default_env_variables='{"VOILA_WS_PROTOCOL":"wss","VOILA_APP_IP":"192.168.1.1"}'
Cell execution timeouts#
By default, Voilà does not have an execution timeout, meaning there is no limit for how long it takes for Voilà to execute and render your notebook. If you have potentially long-running cells, you may wish to set a cell execution timeout so that users of your dashboard will get an error if it takes longer than expected to execute the notebook. For example:
voila --VoilaExecutor.timeout=30 your_notebook.ipynb
With this setting, if any cell takes longer than 30 seconds to run, a TimeoutError will be raised. You can further customize this behavior using the VoilaExecutor.timeout_func and VoilaExecutor.interrupt_on_timeout options.